STEAM Lesson Plan: Robot Basketball
Robot Basketball: Grades 9-12
What would you do if the big game was on the line and you had to nail free throws to win? It’s a movie plot line that’s been with us since the days of Teen Wolf. But…what if you had a team of robots? In this STEAM lesson, students will design a robot to accurately shoot a free-throw three times in a row. This lesson will take approximately 4, 45-minute classes to complete and explore types of levers as well as the concepts of precision and accuracy.

Materials Needed (per group)
- pieces of corrugated cardboard of various sizes
- card stock/file folders
- cups and plates (foam, plastic, and paper; various sizes)
- plastic spoons
- rulers
- string
- pipe cleaners
- craft sticks
- straws
- binder clips of various sizes
- paper clips of various sizes
- craft wire
- skewers
- clay
- scissors
- masking tape
- glue
- various colors of construction paper
- markers
- Materials needed for the entire class: ping pong balls and an empty trash can
Preparation
- Set up “basketball hoop” (trash can) on a desk with a piece of masking tape six feet away (can be closer or further depending on your classroom size).
Introduction
- Ask a student to demonstrate a free-throw shot using crumpled up paper and your basket. Point out the motion they use in their arms from their elbows to their hands. Ask them what machine this looks like (have student repeat motion while class brainstorms). Answer: A lever: a rigid bar that rotates on a fixed point (a fulcrum), which moves or loads. The elbow is the fulcrum and the forearm is the stiff bar. This particular type of lever is known as a third-class lever.
Introduce students to Cue, the basketball playing robot:
Inform students that they are going to create their own basketball-playing robot using the science of building levers and that it needs to make three free throws.
Procedure
- Students will have approximately one hour (over the course of two class periods) to design, build, and test their robots.
- Students need to meet as a team (3-4 students per team), discuss the problem they are solving, design the robot, and agree on materials they will use.
- Students will need to draw a prototype of their design on a sheet of paper before building it.
- Students will build their robots. They may decide during construction to change materials or design. This is okay, but they need to make a new sketch and revise the materials list as they go.
- Next, each team will take turns trying to make their free throws.
- One student will need to be the “recorder” and will place a colored piece of masking tape where the ball first bounces.
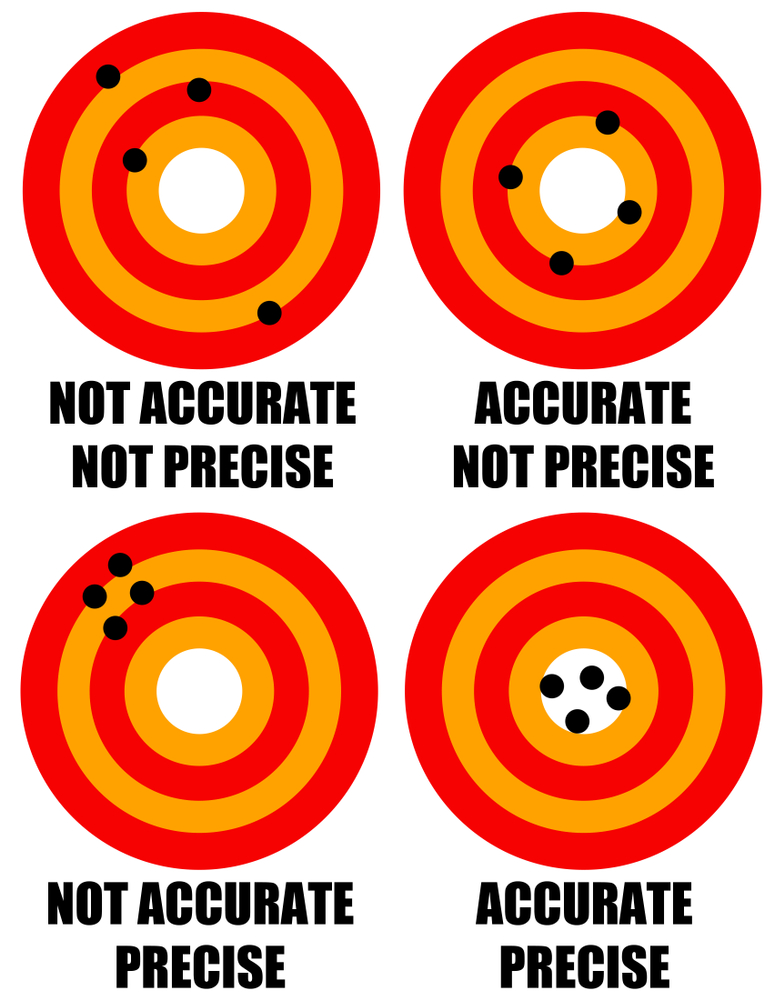
- As each team attempts to make free throws, they will look at the accuracy of the ball (did it land in the basket?) and the precision of the ball (did the balls all land close to each other?)
- If time permits, students can re-design and re-test their robots.

Discussion
Give students time to write down their answers to these questions individually and then discuss them as a class:
- Who was the most accurate? The most precise? The most accurate and precise?
- What went well?
- What didn’t go well?
- Were there any compromises you had to make with your teammates about the design? Explain.
- If you had to redesign your robot again, what changes would you make?